If you are passionate about food, every now and then you might daydream about colourful cupcakes, thirst-quenching smoothies, or elaborate pastries flying around in the sky. But how can you translate these intriguing flavour combinations and colourful images into your very own unique recipes?
There are many ways that can lead you to create your own recipes. I decided to share my own personal recipe writing process with you in the hope that it helps you to get to work and create those recipes that you dream about. Creating unique recipes is so rewarding and it only requires some imagination, a little bit of patience, and lots of perseverance.
My recipe development process can be summarized into 6 easy steps. You can give it a try or use it as inspiration to develop your own methods, depending on your personal style and preferences.
So without waiting any longer, here are the 6 easy steps to follow to create your unique recipes.
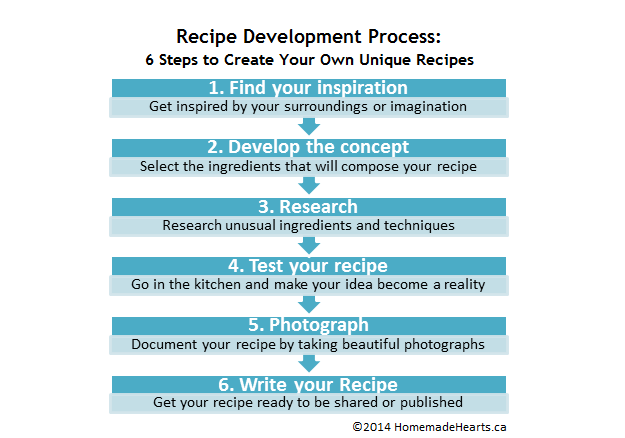
To help give you a better idea of how the steps work, I have elaborated on each of the 6 steps below.
Step 1. Find your Inspiration
Every recipe starts with an idea. There are many ways that you can make an idea grow in your mind. Sometimes ideas for amazing recipes can come to you when you are at work, in the car, or going for a walk. If that is the case for you, great news – you can immediately skip to Step 2! However, for those times when inspiration is lacking, here are some tips I use to generate ideas.
- Think about a recipe that you love and try to adapt it creatively. For example, you could make a recipe you love healthier (gluten-free, vegan – like these Healthy Nanaimo Bars), or present it in a totally different way (such as a deconstructed version).
- Select a feature ingredient and challenge yourself to create an original dish which features this ingredient. For example, when I heard about the Canadian Lentil Recipe Challenge, I bought a bunch of different kinds of lentils, without knowing what to make. When I got home, I started thinking about ideas to make a main course, soup, and dessert featuring this ingredient. This is how I ended up with this Soup, Pasta, and Cookies.
- Walk down the isle of a grocery store and challenge yourself to find a new ingredient that you have never used before, or to just find a few ingredients that you feel like eating and let them inspire you.
- Look in your pantry and find which ingredients seem to be calling out to you. Sometimes, on weeknights, when I am too tired to go to the grocery store or follow a recipe, I just open the fridge and pantry, select a few ingredients, and compose a delicious recipe on the spot. These can often be the most satisfying meals because you had no idea you could do something like this with barely any new groceries!
- When you are having a meal out at a restaurant, scroll through the menu and try to memorize a few ingredient combination or meals that could be fun to create at home, in your own way.
- Sit down in a comfortable chair with a cup of herbal tea and flip through pages of recipe books. When I want inspiration to create a new recipe, I will usually only look at the pictures and try to get ideas of what I want to eat. Another way to see lots of food pictures of course is to go on Pinterest or Foodgawker.
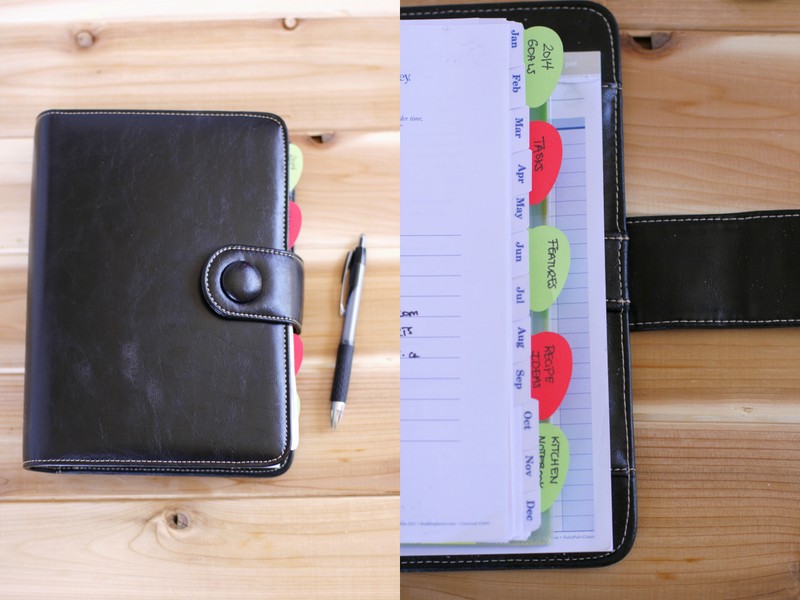
I highly recommend you to always carry a small notebook so you can write down any idea that comes to your mind. You may not create the recipe right away, but this notebook will become highly valuable when you are running out of ideas! I take a small Moleskin notebook in my purse everywhere I go and I also have a larger planner that I use more generally for my blog. Here is a sneak peak of the tool I use to develop my recipe and post ideas. You will see in the picture below that I created an entire tab for recipe ideas (4th tab).
Step 2. Develop the Concept
Hopefully by now you have an idea or a vision for the recipe you want to create. Now, you need to develop the concept for your recipe. Think of developing a recipe concept the same way a musician develops a song: first the musician must decide which instruments are to be included before they begin to compose their music.
Thus, when relating this analogy to your recipe, all you need to do is take a sheet of paper, and list the ingredients you want to use for your recipe and some of the main techniques you will be using. This list should be high level (i.e., without quantities) and is meant to help you remember the general elements of the recipe you wish to create.
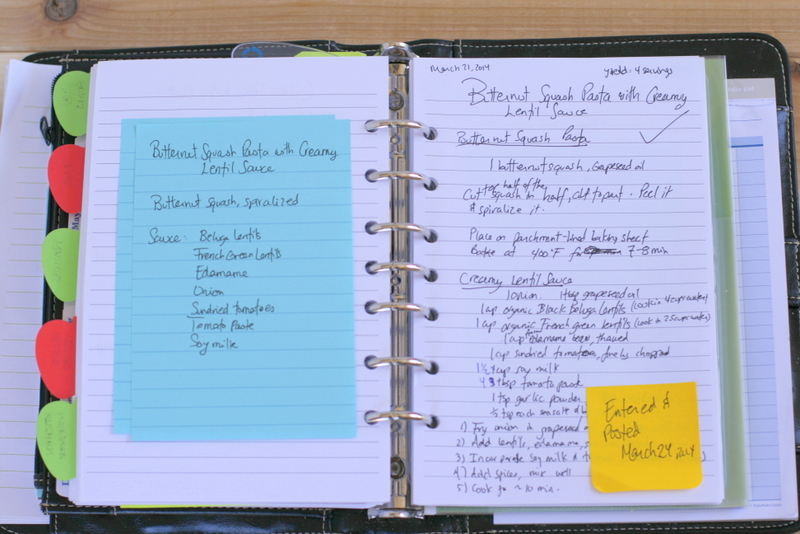
I like to use large Post-It notes for this step. I usually write a draft recipe title, and follow it with a list of the main ingredients I want to use, and write down any special techniques I want to use to develop the recipe. Once I develop my list, I stick it in my Kitchen Notebook and will use this to guide me in completing Steps 3 and 4. Below is a picture of what my notes look like in my Kitchen Notebook – the blue Post-It Note is where I write the concept for my recipe. It may appear as messy, but this is really meant to be a working sheet. Sometimes, I go through a few sheets before I am happy with the concept for my recipe. Your concept may evolve and develop further as you progress with Step 3. This is great and what this process is meant to be!
So once you have figured out the general concept for your recipe, you are ready to go to Step 3.
Step 3. Research
This is the part where you take your concept and do a bit of research on ingredients or techniques. I like to research before I test my recipe to ensure I have all the information I need to make the best of my recipe testing and avoid having to look things up as I am cooking.
I like to find out if there are any special tricks about a specific cooking/baking technique before I start. You can add some notes on your recipe concept page with any techniques or particularities about an ingredient that you might need during the recipe testing process.
For example, if I develop the recipe for a gluten-free muffin, I will look up various techniques for developing gluten-free flour blends, and research proportions of flours, starches, liquids, etc. Each recipe is different and this step might not be needed if you are making something that you are very familiar with.
Step 4. Test Your Recipe
Before you can test your recipe, you need to ensure that you have all the ingredients on hand before you get started. Once you have everything, you can start cooking your recipe using your concept sheet. It is very important that you take copious notes during your tests and write down all the ingredients, measurements and procedures in detail. I also recommend to write down product brands, where applicable, because sometimes a recipe can turn out really well with one brand and not work at all with another.
One thing I highly recommend is to let yourself be inspired during the recipe testing process. If you think of a new ingredient that wasn’t on your original list, give it a try! You never know in which direction it will take your recipe – it just might improve your recipe and make it stand out from others. Of course, don’t get discouraged if it does not work the first time. Sometimes it takes many tries to develop the perfect recipe.
If you modify a recipe that was developed by someone else and want to make it your own, the general rule of thumb to ensure that you are not copying a recipe is to change at least 3 of the ingredients, write your own procedures, and cite the source from which the recipe was adapted.
You can view the details of my recipe testing on the picture of my Kitchen Notebook above. My recipe testing exercise is found on the page located on the right side of the book.
Step 5. Photograph
It is important to take the time to take beautiful photographs of the food you create. People say a picture is worth a thousand words. This saying could now be more truthful. Personally, when I browse through cookbooks, I am immediately attracted by the pictures and am more likely to make the recipe if it is accompanied by a picture. Nowadays, with the Internet and the thousands of food blogs out there, it is critical to include beautiful and inspiring photos with your recipe if you want to stand out and create your own unique style.
Food photography is a beautiful art and it helps inspire others to make your recipes. I am still learning so much everyday about photography, but one thing that is key to a good food photograph is light. Natural light brings out the best in food and a picture taken during the day usually turns out so much prettier than the same picture taken at night with yellow artificial lights.
To learn more about food photography, I did an awesome food photography course from Pinch of Yum: {insert affiliate}. They give lots of great and simple tricks to make your food photos gorgeous.
There are also some really great books out there that I used to learn some more photography tips:
Food Photography: From Snapshots to Great Shots by Nicole S. Young
Food Photography for Bloggers: Focus on the Fundamentals by Matt Armendariz
Plate to Pixel: Digital Food Photography and Styling by Helene Dujardin
Food Styling and Photography for Dummies by Alison Parks-Whitfield
Step 6. Write
The very final step for creating your own unique recipe is to write it using the detailed notes that you took in Step 4. There are various ways for writing recipes, but whatever way you decide to go with, just be consistent. Develop your style and tone and no matter what, write consistent list of ingredients and include detailed instructions in your own words.
There are some great books that I read and use as references when writing my recipes:
The Recipe Writer’s Handbook by Ostmann Baker
Will Write for Food by Dianne Jacob
Once your recipe is written, combine it with your beautiful pictures and post it on your blog, print it in a book, or give it to your friends! Recipes are created to be shared. It is so rewarding to share recipes and flavours with family, friends and your community!
Other Posts You Might Enjoy
 Cookbook Review: The Forest Feast
 How to Start a Food Blog in 5 Easy Steps
 My NYIP Experience: The Complete Course in Professional Photography – Review of Unit 1
 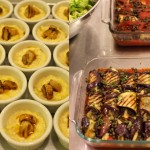 Vegan Umami or The Secret Fifth Flavour: A Review of Cooking Course at The Natural Gourmet Institute
 My NYIP Experience: The Complete Course in Professional Photography – Review of Unit 3
 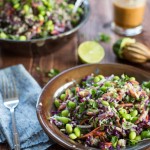 Thai Style Slaw Bowl with Peanut Dressing {Gluten-Free, Vegan}


What a great essay! I have always wondered how bloggers created recipes seemingly out of nowhere, so I’ll have to use some of these techniques as I work on it on my own blog.
Thanks and good luck on your blog and recipe creating adventure!